

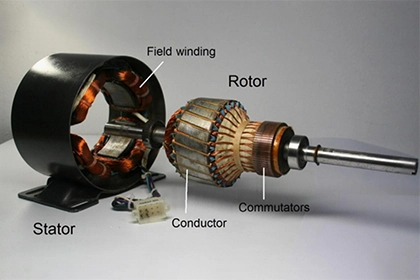
Methods and steps for rewinding AC motor coils
When detecting AC motor faults or repairing them, sometimes it is necessary to rewind the coil. This is not an easy task, and there are some precautions.
I. Coil data of an old motor coil
The following data should be collected completely and accurately and recorded when rewinding an AC motor.
- Total number of motor slots.
- Coil wire diameter (specification type).
- Wiring type (delta or star).
- A parallel branch circuit.
- Number of parallel winding roots.
- Winding method (single layer or double layer).
- Number of turns per coil.
- Pitch (across how many slots).
- Draw the winding expansion diagram.
- Measure the length of the coil ends and straight parts.
- Thickness of coil main insulation and interlayer insulation (number of layers) and material specifications.
Ⅱ. Preparation work before rewinding
- Make a winding mold according to the measured data. Note that the wire mold can't be too large or too small.
- Wind the coil according to the number of turns.
- Prepare insulating materials, slot wedges, and embedded wire tools.
- Clean the slot.
Ⅲ. Precautions
- The coil should be embedded before the insulation pad, and the insulation should be cut out of the core length according to the size of the motor capacity to determine the general length of the core (15 ~ 25 mm).
- When the coil is embedded, pay attention to the groove of the wire, the main insulation can't be damaged.
- The length of both ends should be even and neatly arranged.
- Double-layer winding should be embedded in the lower edge first. Insulation should be padded between layers.
- According to the unfolding diagram, the motors will be connected to the coil, welded with solder, with no insulation part of the insulation bandage. Tie the end with a tie rope, and do not loosen neatly. Coil end formation into a flare.
Ⅳ. Motor dip paint
- Before dipping, the paint will be pre-dried at 105 ~ 110 °C for 4-6 hours. Pre-drying must be thorough, if the moisture is not discharged, paint can't be discharged after dipping.
- Conditions can be used for the immersion method, the motor will be inverted (in an upright direction) and fully immersed in paint, it needs to be immersed for 10 ~ 15 minutes with no vapor bubbles out of the end.
- Can be used many times with the pouring method: the motor is inverted (in an upright direction), put a paint plate below, with the paint from the top of the irrigation until the lower end of all the water is exposed, turn over, and then use the above method to pour. After dipping the lacquer, put it in the air to drip dry, and wipe the inner cavity of the iron core clean.
- Gradually increase the temperature of the motor to dry, pre-drying the same. With the same method after several times of dipping paint drying, each drying in the middle of at least 6 h. The last drying should be done while the temperature remains unchanged (105–110 °C). Insulation resistance is stable (greater than or equal to 0.5 MΩ). stable 3-5 hours for qualified.
- Wire-wound motor rotor replacement coil with the above method of dip paint.
- Commonly used motor dipping paint grade 1032 melamine alkyd paint. Do not use any grade or gas in the insulating paint.
V. Motor test
- Measure the insulation resistance of the motor.
- Measure the DC resistance of the coil.
- Measure polarity.
- The coil withstands a voltage test.
- No-load test.
Ⅵ. Steps for rewinding motor stator winding
When the motor winding is seriously damaged and cannot be repaired locally, the whole original winding should be removed and embedded into a new winding. The steps for rewinding the stator winding are as follows:
Identify the cause of the damage and record the original data
Identify the cause of the damage to prevent re-burning after repair. Record the original data and fill in the motor repair record sheet. When dismantling the winding, a more complete coil should be left so that the dimensions of each part can be measured. The test data in the record sheet should be filled in after the test, after rewinding.
Removing damaged stator winding
Removal of stator windings has the following methods:
- current heating method: the winding end connection dismantled, in a phase of the winding into a single-phase low-voltage current heating, when the insulation softens, the winding smoke, cut off the power supply, hit the groove wedge, and ride the heat to dismantle the winding.
- Use the oven, blowtorch, and other heating methods, and quickly remove the winding. Pay attention to the heating to prevent burning the iron core.
- Solvent dissolution method: this method is only applicable to the removal of 1 kW or less small motor windings. Commonly used solvents are toluene and paraffin.
- Cold pulling method: cut one end of the coil close to the core and pull out the wire at the other end with pliers, such as the coil bonded into a whole, can be used as a small iron bar against the end of the cut coil with a hammer to knock out.
Prepare insulating materials
- Insulation in the slot: the use of slotting paper or temporary slotting paper, depending on the length of the core and the capacity of the motor.
- end insulation: end of the same with the phase insulation between a layer of polyester film composite insulation paper, end insulation must be tied fixed.
- lead wire insulation: lead wire and winding end line connected to the part, with alkyd glass paint cloth tape half stacked package a layer, the outside and then set with alkyd glass wire sleeve, when tying the end will be tied together.
Spare coil
- The simple production of the winding mold: stator coil is rapped on the winding mold.
- Coil rapping: small three-phase asynchronous motor with loose embedded coils is in the winding machine using wire mold winding.
- Coil rapping: Small three-phase asynchronous motors with loose embedded coils are wound on a winding machine using a wire mold.
- rapping coil should pay attention to: winding wire should be neatly arranged to avoid cross-confusion; turns must be accurate; wire diameter matches; wire insulation is intact; winding coil should be tied at both ends of the loose; after winding with a bridge to measure the DC resistance of each phase of the winding, check the number of turns of the coil.
Leave a Comment